Blog

  • A Four Node Kubernetes Cluster for Your Home Lab

    A Four Node Kubernetes Cluster for Your Home Lab

    Introduction

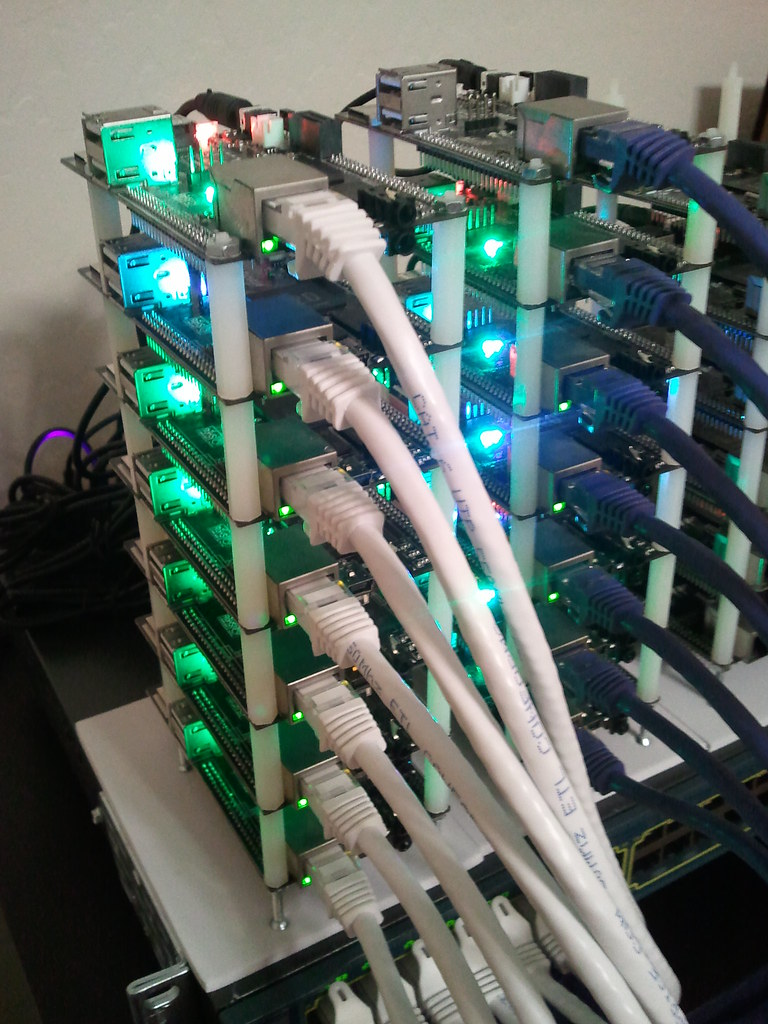
    While I have this on my mind, I decided to build a microk8s cluster from a bunch of raspberry pis that I have laying around. Why? In practice more useful than minikube which is also great for local development.

    What we will be using

    1. Ubuntu 22.04.03 Linux distribution
      • 32 bit for contro pi 3b armhf
      • 64 bit for 4 arm64
    2. Ansible
    3. microk8s
    4. prometheus, grafana, node_exporter

    Using five raspberry pi’s. One for an Ansible control to deploy software and four for our microk8s cluster

    Hardware Setup

    IP Allocation

    I added address reservations on my router to automatically assign an IP to a known MAC address on a Raspberry pi. This ensures that the pi will have the same IP address each time it boots. No messing with the network configuration in the operating system every time I re-install the OS. Since this is technically a test environment where I will burn-and-build at will. I will not go through this excercise as there ae many ways to do this on a DHCP server.

    To obtain the MAC aaddress, I first installed an OS on the pi and noted down the MAC.

    OS Installation

    Use raspberry pi imager. You can download the softwaere here https://www.raspberrypi.com/software/

    Ansible

    for automation

    Copy Ansible keys to other hosts from cloudletcmd

    ssh-copy-id -i ansible_rsa.pub pi@192.168.1.200
    ssh-copy-id -i ansible_rsa.pub pi@192.168.1.201
    ssh-copy-id -i ansible_rsa.pub pi@192.168.1.202
    ssh-copy-id -i ansible_rsa.pub pi@192.168.1.203

    ansible-playbook update.yml –ask-become-pass
    ansible all -m ping

    For microk8s

    sudo nano /boot/firmware/cmdline.txt

    add the following to the file
    cgroup_enable=memory cgroup_memory=1

    then reboot
    sudo reboot

    MicroK8s

    sudo snap install microk8s --classic
    sudo apt install linux-modules-extra-raspi
    sudo microk8s stop; sudo microk8s start

    sudo microk8s.add-node <- have to run for each node

    From the node you wish to join to this cluster, run the following:
    microk8s join 192.168.1.200:25000/cfd6f5addae6e0959a4c7f1de1f47a47/583d9c2f5994

    Use the ‘–worker‘ flag to join a node as a worker not running the control plane, eg:
    microk8s join 192.168.1.200:25000/cfd6f5addae6e0959a4c7f1de1f47a47/583d9c2f5994 --worker

    If the node you are adding is not reachable through the default interface you can use one of the following:
    microk8s join 192.168.1.200:25000/cfd6f5addae6e0959a4c7f1de1f47a47/583d9c2f5994

    192.168.1.200 cloudlet01
    192.168.1.201 cloudlet02
    192.168.1.202 cloudlet03
    192.168.1.203 cloudlet04

    microk8s join 192.168.1.200:25000/0c4812f17a41a0a6c9e0a931d263d0eb/583d9c2f5994
    microk8s enable ha-cluster on main node

    kube config

    to add to .kube/config run sudo microk8s config and add output to config.

    sudo usermod -a -G microk8s pi

    Prometheus

    Set up

    Manually setting up Prometheus node exporter

    sudo groupadd --system prometheus
    sudo useradd -s /sbin/nologin --system -g prometheus prometheus
    sudo apt update
    sudo apt -y install wget curl vim
    sudo apt autoremove
    curl -s https://api.github.com/repos/prometheus/node_exporter/releases/latest | grep browser_download_url | grep linux-arm64 | cut -d '"' -f 4 | wget -qi -
    tar xvf node_exporter-1.5.0.linux-armv7.tar.gz
    cd node_exporter-1.5.0.linux-armv7/
    sudo mv node_exporter /usr/local/bin
    node_exporter --version

    A basic service config for node_exporter:
    sudo vim /etc/systemd/system/node_exporter.service

    [Unit]
    Description=Prometheus
    Documentation=https://github.com/prometheus/node_exporter
    Wants=network-online.target
    After=network-online.target

    [Service]
    Type=simple
    User=prometheus
    Group=prometheus
    ExecReload=/bin/kill -HUP $MAINPID
    ExecStart=/usr/local/bin/node_exporter \
    --collector.cpu \
    --collector.diskstats \
    --collector.filesystem \
    --collector.loadavg \
    --collector.meminfo \
    --collector.filefd \
    --collector.netdev \
    --collector.stat \
    --collector.netstat \
    --collector.systemd \
    --collector.uname \
    --collector.vmstat \
    --collector.time \
    --collector.mdadm \
    --collector.zfs \
    --collector.tcpstat \
    --collector.bonding \
    --collector.hwmon \
    --collector.arp \
    --web.listen-address=:9100 \
    --web.telemetry-path="/metrics"

    [Install]
    WantedBy=multi-user.target

    sudo systemctl daemon-reload; sudo systemctl start node_exporter; sudo systemctl enable node_exporter; sudo systemctl status node_exporter

    Remove microk8s

    sudo microk8s reset

    sudo snap remove microk8s

    Resources

    https://microk8s.io/docs/install-raspberry-pi

  • Developing Under WSL

    Developing Under WSL

    Do you use WSL (Windows Subsystem for Linux) and do development using technologies such as Docker and Ansible? If you are using VS Code, you can develop in Linux directly from Windows using the Visual Studio Code Remote – WSL extension.

    This extension is installed on the Windows end within VS Code. You can then open up VS Code within your WSL terminal with the command code . which will open VS Code on the Windows side.

    Check out more here: https://code.visualstudio.com/docs/remote/wsl

  • Setting up a new Windows Laptop with DevOps tools.

    Setting up a new Windows Laptop with DevOps tools.

    About

    This guide is meant as a general guide to set up a Windows machine with a suite of DevOps tools. This guide assumes the user has a working knowledge of these tools. It is not meant for a novice.

    This setup is being performed on a brand new Windows 11 Home Intel Core i9 with 32MB RAM.

    Programming Languages

    Python

    Python is an open source programming language that can run on many different architectures. It has a syntax that is easy to learn and is notable as a learning language,

    Head over to https://www.python.org/downloads/ and download the latest version of Python. As of this writing, version 3.10.1 is available.

    Run the installer an make sure you add python to PATH. Open a command prompt and test with:

    python –version

    Coding IDE

    My preference is VS Code. A good IDE is a MUST for any DevOps engineer.

    Visual Studio Code

    Visual Studio Code is a source-code editor made by Microsoft for Windows, Linux and macOS. Features include support for debugging, syntax highlighting, intelligent code completion, snippets, code refactoring, and embedded Git.

    https://en.wikipedia.org/wiki/Visual_Studio_Code

    Free and is very customizable. Head on over to https://code.visualstudio.com/docs/?dv=win to download the installer. Version 1.63 is available as of this writing.

    PyCharm

    alternative, Python specific

    Source Code Management

    The goal of any successful engineer is to have repeatable and reproducible methods. This goal can be achieved by storing all work in a repository. Git is the most common SCM at this point in time.

    Store your source for free on github or gitlab. Download the git CLI from https://git-scm.com/download/win

    Git is easy to learn and has a tiny footprint with lightning fast performance. It outclasses SCM tools like Subversion, CVS, Perforce, and ClearCase with features like cheap local branching, convenient staging areas, and multiple workflows.

    https://git-scm.com/

    Virtualization

    VirtualBox

    VirtualBox is a powerful x86 and AMD64/Intel64 virtualization product for enterprise as well as home use. Not only is VirtualBox an extremely feature rich, high performance product for enterprise customers, it is also the only professional solution that is freely available as Open Source Software under the terms of the GNU General Public License (GPL) version 2. See “About VirtualBox” for an introduction.

    https://www.virtualbox.org/

    As of this writing, version 6.1.30 is available. Download the Windows installer here: https://www.virtualbox.org/wiki/Downloads

    Infrastructure Automation

    aws-cli

    https://aws.amazon.com/cli/

    vagrant

    https://www.vagrantup.com/

    Plugins (additional)

    vagrant plugin install vagrant-disksize

    terraform

    download here https://www.terraform.io/downloads

    Alternately install with chocolatey:

    choco install terraform

    Docker

    https://www.docker.com/products/docker-desktop

    uh oh for WSL 2

    https://docs.microsoft.com/en-us/windows/wsl/install-manual#step-4—download-the-linux-kernel-update-package

    chocolatey

    Chocolatey is a software management solution unlike anything else you’ve ever experienced on Windows. Chocolatey brings the concepts of true package management to allow you to version things, manage dependencies and installation order, better inventory management, and other features.

    https://chocolatey.org/
    1. First, ensure that you are using an administrative shell – you can also install as a non-admin, check out Non-Administrative Installation.
    2. Install with powershell.exe📝 NOTE: Please inspect https://community.chocolatey.org/install.ps1 prior to running any of these scripts to ensure safety. We already know it’s safe, but you should verify the security and contents of any script from the internet you are not familiar with. All of these scripts download a remote PowerShell script and execute it on your machine. We take security very seriously. Learn more about our security protocols.With PowerShell, you must ensure Get-ExecutionPolicy is not Restricted. We suggest using Bypass to bypass the policy to get things installed or AllSigned for quite a bit more security.
      • Run Get-ExecutionPolicy. If it returns Restricted, then run Set-ExecutionPolicy AllSigned or Set-ExecutionPolicy Bypass -Scope Process.Now run the following command:
      • Set-ExecutionPolicy Bypass -Scope Process -Force; [System.Net.ServicePointManager]::SecurityProtocol = [System.Net.ServicePointManager]::SecurityProtocol -bor 3072; iex ((New-Object System.Net.WebClient).DownloadString(‘https://community.chocolatey.org/install.ps1’))
    3. Paste the copied text into your shell and press Enter.
    4. Wait a few seconds for the command to complete.
    5. If you don’t see any errors, you are ready to use Chocolatey! Type choco or choco -? now, or see Getting Started for usage instructions.

    Additional Tools

    mRemoteNG

    mRemoteNG is a fork of mRemote: an open source, tabbed, multi-protocol, remote connections manager for Windows. mRemoteNG adds bug fixes and new features to mRemote and allows you to view all of your remote connections in a simple yet powerful tabbed interface.

    https://mremoteng.org/

    This is a tool for all remote connections. Supports VNC, RDP, SSH, and others, all in a single GUI Interface. PuTTY is used in the backend for SSH connections. Download the latest version here: https://mremoteng.org/download

  • HashiQube

    HashiQube

    What is this?

    A colleague turned me on to this interesting project that pulls together some or all of HashiCorps offerings. They all run within a virtual instance on a local machine. This could prove useful for discovering how each component works.

    You can find the project here: https://servian.github.io/hashiqube/

    Getting it to work.

    You will need Vagrant and Docker to get this up and running.

  • Retrogaming in a Browser

    Retrogaming in a Browser

    I am an active contributor to a local retro gaming community located on Long Island in NY. The organization has been putting on a yearly show, The Long Island Retro Gaming Expo, for five years now. I started actively contributing in 2016, and am now leading a team of individuals that maintain and operate all free play offerings for the organization. Free play consists of all sorts of retro gaming home consoles from companies such as Atari, Coleco, Nintendo, Sega, and NEC. It is a large list! In 2018 we started offering PC gaming as a free play option. This currently includes Mac and DOS gaming. In late 2019 we started planning for the 6th annual LI Retro Gaming Expo. Unfortunately the COVID-19 pandemic hit and we, as an organization, had a tough choice. Should we cancel the 2020 expo? We ultimately cancelled the annual Expo in March of 2020, but decided to forge ahead and offer a virtual convention. This turned out to be UPLINK, which took place on the second weekend in August of 2020.

    Since UPLINK is an entirely online experience, there was a need to engage the audience in a virtual free play experience. Free play is one of the core offerings of the Expo. You get to sit down and play Space Invaders on genuine Atari hardware, play through the first levels of DOOM on a physical PC, and wander the Oregon Trail on a Macintosh.

    Fast forward to today, UPLINK was a success, and it opened additional options for this local retro gaming community to spread the word on how gaming is a community experience.

    em_dosbox
    other blog posts
    compiling in vagrant
    releasing to docker
    todo: shrink image, frontend

  • Welcome Back!

    I haven’t posted in a few years mainly due to disinterest and neglect. Last year I came back to this site only to find it in shambles with no backup. So, I decided to fix it up. I haven’t made any new posts up until now. I will try to post things that are relevant to the DevOps world, yet useful in other areas of life. Let’s get back to this!

  • Creating an HTPC Stack With Docker Things, Part 2

    This is a continuation of my previous post: Create an HTPC Stack With Docker Things. I will introduce docker-compose to bring up an environment with both containers used previously, sabnzbd and sickbeard.

    I installed docker-compose using the instructions found here: Install Compose. I am using Mac OS X.

    First make sure boot2docker is running, boot2docker up. Then create the following file named docker-compose.yml.

    sickbeard:
      image: maxexcloo/sickbeard 
      ports:
       - "8081:8081"
      name:
       - "sickbeard"
    sabnzbd:
      image: maxexcloo/sabnzbd
      ports:
       - "8080:8080"
      name:
       - "sabnzbd"
    

    This is setting up the environment with two images, exposing the ports the application will run on and naming the image to something meaningful. each directive in the yml file map to the same docker run command.

    Once this file has been created, simply run docker-compose up, and the images will be started.

    To-Do

    • create a github repo for application configs.
    • map a local directory for configs.
    • add the local config directory to the yml.
    • more things…
  • Remove all unused Docker images

    Remove all unused Docker images

    Running out of disk space on your Docker host? Here is a quick one liner to remove all unused Docker images:

    docker images -q |xargs docker rmi

    It will error on images that a running container is using, and won’t delete it.

    I found this little gem in the Docker forums here:

    Docker forums

  • Creating an HTPC Stack With Docker Things

    Introduction

    This will be a mess until I figure it all out. In this article, I will demonstrate using tools such as packer, docker client, docker-machine to build out a Docker host with an HTPC stack. The following applications will be used:

    • Sickbeard
    • Sabnzbd+
    • HTPC Manager
    • Plex
    • Transmission web interface
    • Couch Potato

    I will be using the latest Ubuntu 14.04 server distribution. This is being developed on Mac OSX Yosemite 10.10.2.

    This is a WIP and will be complete when it is complete. Some of these tools I have not used yet and am learning as I go!

    Expect many changes as I figure this out!

    Setup

    You will need the following tools to start:

    This article assumes you have installed, and are familiar with the above tools.

    I have created a root directory named htpc where all project files will reside.

    The Docker Host

    First create a new Docker host with the docker-machine command:

    docker-machine create --driver virtualbox htpc

    Now, point your docker client at the new Docker host:

    $(docker-machine env htpc)

    Sickbeard container

    Docker hub contains thousands of community made images. Searching the hub for a Sickbeard image returns many results. I chose maxexcloo/sickbeard for this example. It is Debian based. First, we need to pull the image.

    docker pull maxexcloo/sickbeard

    Now run it:

    docker $(docker-machine config htpc) run -d -p 8081:8081 --name="sickbeard" maxexcloo/sickbeard

    This command will expose port 8081 and run the image in daemon mode (detached).

    the –name”” argument provides a nice name that will show up in the NAME column from the output of docker ps. If this argument is not suppled, a random name will be generated.

    We are almost finished. To find the IP of the Docker host:

    docker-machine ip

    Finally, you can point your browser at http://<docker host ip>:8081.

    Sabnzbd+

    As with Sickbeard, this container will be run similarly.

    docker pull maxexcloo/sabnzbd

    docker $(docker-machine config htpc) run -d -p 8080:8080 –name=”sabnzbd” maxexcloo/sabnzbd

    Running docker ps will show something like this:

    CONTAINER ID        IMAGE                        COMMAND                CREATED             STATUS              PORTS                    NAMES
    b432e5cbf6df        maxexcloo/sabnzbd:latest     "/bin/sh -c /config/   5 seconds ago       Up 4 seconds        0.0.0.0:8080->8080/tcp   pensive_ritchie     
    dbcd9f132908        maxexcloo/sickbeard:latest   "/bin/sh -c /config/   5 minutes ago       Up 5 minutes        0.0.0.0:8081->8081/tcp   suspicious_tesla

    We now have a Docker host running two images!

    Further Thoughts

    If this all works out as intended, possibly use vagrant-managed-servers to build out a server that already has an OS on it.

    Make my own images.

    References

    http://kappataumu.com/articles/creating-an-Ubuntu-VM-with-packer.html

    https://www.packer.io/docs/builders/virtualbox-iso.html

    https://registry.hub.docker.com/u/maxexcloo/sickbeard/

  • rsyslog

    To sanity check the rsyslog config files use:

    rsyslogd -N1