Tag: ubuntu

  • A Four Node Kubernetes Cluster for Your Home Lab

    A Four Node Kubernetes Cluster for Your Home Lab

    Introduction

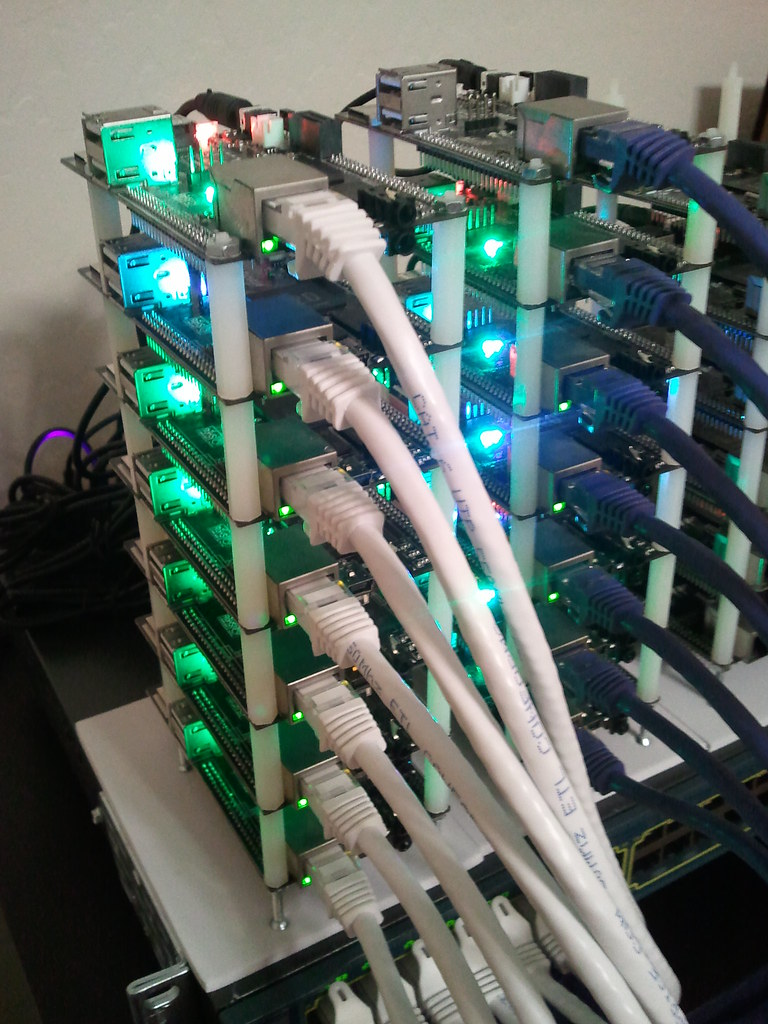
    While I have this on my mind, I decided to build a microk8s cluster from a bunch of raspberry pis that I have laying around. Why? In practice more useful than minikube which is also great for local development.

    What we will be using

    1. Ubuntu 22.04.03 Linux distribution
      • 32 bit for contro pi 3b armhf
      • 64 bit for 4 arm64
    2. Ansible
    3. microk8s
    4. prometheus, grafana, node_exporter

    Using five raspberry pi’s. One for an Ansible control to deploy software and four for our microk8s cluster

    Hardware Setup

    IP Allocation

    I added address reservations on my router to automatically assign an IP to a known MAC address on a Raspberry pi. This ensures that the pi will have the same IP address each time it boots. No messing with the network configuration in the operating system every time I re-install the OS. Since this is technically a test environment where I will burn-and-build at will. I will not go through this excercise as there ae many ways to do this on a DHCP server.

    To obtain the MAC aaddress, I first installed an OS on the pi and noted down the MAC.

    OS Installation

    Use raspberry pi imager. You can download the softwaere here https://www.raspberrypi.com/software/

    Ansible

    for automation

    Copy Ansible keys to other hosts from cloudletcmd

    ssh-copy-id -i ansible_rsa.pub pi@192.168.1.200
    ssh-copy-id -i ansible_rsa.pub pi@192.168.1.201
    ssh-copy-id -i ansible_rsa.pub pi@192.168.1.202
    ssh-copy-id -i ansible_rsa.pub pi@192.168.1.203

    ansible-playbook update.yml –ask-become-pass
    ansible all -m ping

    For microk8s

    sudo nano /boot/firmware/cmdline.txt

    add the following to the file
    cgroup_enable=memory cgroup_memory=1

    then reboot
    sudo reboot

    MicroK8s

    sudo snap install microk8s --classic
    sudo apt install linux-modules-extra-raspi
    sudo microk8s stop; sudo microk8s start

    sudo microk8s.add-node <- have to run for each node

    From the node you wish to join to this cluster, run the following:
    microk8s join 192.168.1.200:25000/cfd6f5addae6e0959a4c7f1de1f47a47/583d9c2f5994

    Use the ‘–worker‘ flag to join a node as a worker not running the control plane, eg:
    microk8s join 192.168.1.200:25000/cfd6f5addae6e0959a4c7f1de1f47a47/583d9c2f5994 --worker

    If the node you are adding is not reachable through the default interface you can use one of the following:
    microk8s join 192.168.1.200:25000/cfd6f5addae6e0959a4c7f1de1f47a47/583d9c2f5994

    192.168.1.200 cloudlet01
    192.168.1.201 cloudlet02
    192.168.1.202 cloudlet03
    192.168.1.203 cloudlet04

    microk8s join 192.168.1.200:25000/0c4812f17a41a0a6c9e0a931d263d0eb/583d9c2f5994
    microk8s enable ha-cluster on main node

    kube config

    to add to .kube/config run sudo microk8s config and add output to config.

    sudo usermod -a -G microk8s pi

    Prometheus

    Set up

    Manually setting up Prometheus node exporter

    sudo groupadd --system prometheus
    sudo useradd -s /sbin/nologin --system -g prometheus prometheus
    sudo apt update
    sudo apt -y install wget curl vim
    sudo apt autoremove
    curl -s https://api.github.com/repos/prometheus/node_exporter/releases/latest | grep browser_download_url | grep linux-arm64 | cut -d '"' -f 4 | wget -qi -
    tar xvf node_exporter-1.5.0.linux-armv7.tar.gz
    cd node_exporter-1.5.0.linux-armv7/
    sudo mv node_exporter /usr/local/bin
    node_exporter --version

    A basic service config for node_exporter:
    sudo vim /etc/systemd/system/node_exporter.service

    [Unit]
    Description=Prometheus
    Documentation=https://github.com/prometheus/node_exporter
    Wants=network-online.target
    After=network-online.target

    [Service]
    Type=simple
    User=prometheus
    Group=prometheus
    ExecReload=/bin/kill -HUP $MAINPID
    ExecStart=/usr/local/bin/node_exporter \
    --collector.cpu \
    --collector.diskstats \
    --collector.filesystem \
    --collector.loadavg \
    --collector.meminfo \
    --collector.filefd \
    --collector.netdev \
    --collector.stat \
    --collector.netstat \
    --collector.systemd \
    --collector.uname \
    --collector.vmstat \
    --collector.time \
    --collector.mdadm \
    --collector.zfs \
    --collector.tcpstat \
    --collector.bonding \
    --collector.hwmon \
    --collector.arp \
    --web.listen-address=:9100 \
    --web.telemetry-path="/metrics"

    [Install]
    WantedBy=multi-user.target

    sudo systemctl daemon-reload; sudo systemctl start node_exporter; sudo systemctl enable node_exporter; sudo systemctl status node_exporter

    Remove microk8s

    sudo microk8s reset

    sudo snap remove microk8s

    Resources

    https://microk8s.io/docs/install-raspberry-pi

  • Apache2 on Ubuntu 14.04 LTS

    I am just poking around the latest LTS from Canonical. It looks like the Apache configs have a new directory hierarchy. There are now conf-available and conf-enabled directories. A small intellectual jump, before looking things up, led me to the command a2enconf. How nice! I wonder if this will complicate things…

  • Java on Ubuntu 13.04 (Raring Ringtail)

    Installing Oracle Java on Ubuntu can be a pretty daunting task. After reading the Ubuntu documentation here:

    Java

    I came across this nice github project:

    oab-java6

    Simply run

    git clone https://github.com/flexiondotorg/oab-java6.git

    Then cd into oab-java6 and run

    sudo ./oab-java.sh

    This will set up a local apt repository for Sun Java 6 and Oracle Java 7. Now run

    sudo apt-get update

    to add the packages from the repository. As the documentation states, you can now run

    sudo apt-get install sun-java6-jre

    To install Java 6 runtime environment.

    One small thing to note:

    I had to run

    sudo update-alternatives --config java

    and select the Sun JRE since the system defaulted to IcedTea.

    Now do

    java -version

    to see what you have!

  • Install Oracle JDK 8 on Ubuntu Server

    I am trying to evaluate the MySQL plugin for NewRelic so I have to install a JRE on the MySQL server. Gut instinct tells me to go with Oracle JRE….not the alternatives. So, Here is what I did to install JRE 8.

    sudo add-apt-repository ppa:webupd8team/java
    sudo apt-get update
    sudo apt-get install oracle-java8-installer
    

    If you receive an error while adding the ppa, something like this:

    error sudo: add-apt-repository: command not found
    

    then

    sudo apt-get install python-software-properties
    
  • Add Your own Script to Default Run Levels in Ubuntu

    This uses the old Sys V init.d scripts. Not upstart. I may write a post on upstart at a later date. So, you write a cool script that you want to run at startup. Place it in /etc/rc.d/init.d and make it executable. Next run the following command:

    sudo update-rc.d my_cool_script defaults
    

    This will set the script to run on all the default run levels.

  • Install vmware tools on Ubuntu 13.04 (Raring Ringtail)

    I am doing this on server edition.
    First do an apt-get update, then apt-get upgrade to bring the entire system current. Then install build tools and kernel headers with the following command:

    sudo apt-get install build-essential linux-headers`uname -r`
    

    Now click on the Install VMWare Tools option on your Guest. On your VM, run the following command:

    sudo mount /dev/sr0 /mnt
    

    Then copy the tools image to the Guest:

    cp /mnt/VMwareTools-8.6.10-913593.tar.gz /tmp
    

    You may have a different version of VMwareTools. Now ruun the following commands:

    cd /tmp
    tar -xzvf VMwareTools-8.6.10-913593.tar.gz
    cd vmware-tools-distrib
    

    Now start the install:

    sudo ./vmware-install.pl
    

    I chose all the default values. I did not install any options marked [EXPERIMENTAL]. When the installer is searching for valid headers, I received an error that they could not be found in “”. So, a little searching and I found that some of the headers moved so:

    sudo ln -s /usr/src/linux-headers-$(uname -r)/include/generated/uapi/linux/version.h /usr/src/linux-headers-$(uname -r)/include/linux/version.h
    
  • Installing mod_security

    sudo aptitude install libapache2-modsecurity

    sudo mkdir /etc/apache2/modsecurity

    sudo vi /etc/apache2/conf.d/modsecurity.conf

    ## /etc/init.d/apache2/conf.d/modsecurity.conf
    Include modsecurity/*.conf

    cd /etc/apache2/modsecurity/

    sudo cp -R /usr/share/modsecurity-crs/base_rules/* .

    sudo vi /etc/apache2/modsecurity/modsecurity_crs_20_protocol_violations.conf

    Replace this line:

    SecRule REQBODY_ERROR “!@eq 0” \


    with this one:

    SecRule REQBODY_PROCESSOR_ERROR “!@eq 0” \ 

    sudo service apache2 restart

    cat /var/log/apache2/error.log | grep modsecurity

  • Fix Network Iface on cloned ubuntu VM

    Since the MAC address changes, the interface will not be configured, so


    rm /etc/udev/rules.d/70-persistent-net.rules

  • Installing packages in Ubuntu from cdrom (no Internet)

    In many cases, the dev class vm’s do not have Internet access (annoying) so you cannot install software vi the Internet.

    Mount the ISO in the VM.

    On the server run the following command:

    sudo mount /dev/sr0 /cdrom

    ensure that only the following line is uncommented in /etc/ap[t/sources.list

    deb cdrom:[Ubuntu-Server 10.04 LTS _Lucid Lynx_ – Release amd64 (20100427)]/ lucid main restricted

    Run sudo apt-get update to update the repository. Then install what you need.

  • Nagios all over the place…

    /usr/bin – binary

    /usr/share/nagios – main web site content

    /usr/lib/nagios – CGI’s

    /var/nagios – logs, archives, external commands

    /etc/nagios – configs

    /var/log/nagios – logs

    /usr/include/nagios – headers